
In Part 1 of this series, we showed you the key metrics you can monitor to understand the health of your Amazon ECS and Amazon EKS clusters running on AWS Fargate. In this post, we’ll show you how you can:
- Collect metrics from ECS on Fargate
- Collect metrics from EKS on Fargate
- Collect logs from ECS and EKS on Fargate
Collecting metrics from ECS on Fargate
You can use Amazon CloudWatch and related AWS services to gain visibility into your ECS clusters and the Fargate infrastructure that runs them. In this section, we’ll look at Amazon CloudWatch and show you how you can use CloudWatch Container Insights to collect and view metrics from ECS on Fargate.
Amazon CloudWatch
Amazon CloudWatch is the native AWS monitoring service. You can use the CloudWatch console to view, analyze, and alert on all of your AWS monitoring data. In this section, we’ll show you how CloudWatch uses namespaces to organize monitoring data from different services; how to set up CloudWatch Container Insights for ECS; and how to view, query, and alert on metrics and logs in CloudWatch.
CloudWatch aggregates monitoring data from many AWS services. It stores metrics from each service in a dedicated namespace. You can refer to any CloudWatch metric by the unique combination of its metric name plus its namespace.
CloudWatch collects ECS metrics in two separate namespaces. AWS/ECS is the namespace where CloudWatch automatically collects resource reservation and utilization metrics. AWS introduced Container Insights to extend ECS monitoring. Container Insights collects metrics from containerized applications running in AWS—including ECS running on Fargate. Metrics collected by Container Insights are custom metrics and are subject to AWS custom metrics pricing.
When you enable Container Insights, CloudWatch collects additional metrics in the ECS/ContainerInsights namespace that describe the status of your ECS tasks and the number of running services, containers, and deployments. Resource usage metrics from the infrastructure on which your ECS tasks are running—whether Fargate or EC2—will also appear in that namespace.
Container Insights does not collect data on EKS clusters running on Fargate. ContainerInsights—a separate namespace from ECS/ContainerInsights—is where CloudWatch stores EKS performance and resource metrics, but only from EC2-backed EKS clusters, not EKS clusters on Fargate.
You may find that metrics from many other namespaces are useful to you as you monitor the other AWS services your containerized applications rely on. For example, if your ECS service is running behind an Application Load Balancer (ALB), it can be helpful to correlate metrics from ECS with metrics from the AWS/ApplicationELB namespace.
Set up Container Insights for ECS
You can enable Container Insights on any of your ECS clusters using either the ECS console or the AWS command-line interface (CLI). You can also configure your AWS account to automatically enable Container Insights on all new ECS clusters you create. The examples in this section will give you guidance on enabling Container Insights on your new and existing ECS clusters.
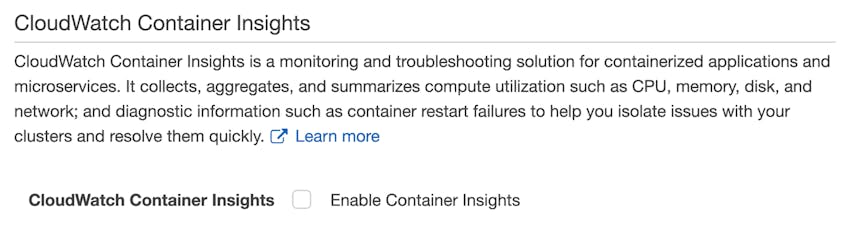
To enable Container Insights on a cluster you’re creating in the ECS console, you need to check the Enable Container Insights box when you create the cluster. The screenshot below shows the portion of the ECS console’s Configure cluster screen where you’ll find this option.
To create a new ECS cluster from the command line, first install the CLI if you haven’t already. Then use the create-cluster command to create your cluster, and include the --settings parameter to enable Container Insights.
The sample code below illustrates using the AWS CLI to create a new ECS cluster named my-ecs-cluster that uses Container Insights. (Note that the command also includes the --capacity-providers parameter, which instructs ECS to launch the cluster on Fargate. See Part 1 of this series for more information about capacity providers.)
aws ecs create-cluster --cluster-name my-ecs-cluster --capacity-providers FARGATE --settings name=containerInsights,value=enabledTo confirm that your create-cluster command was successful, you can retrieve information about your new cluster using the describe-clusters command as shown below:
aws ecs describe-clusters --clusters my-ecs-clusterTo confirm that Container Insights is enabled on the new cluster, look for the following lines in the output of the describe-clusters command:
[...]
            "settings": [
                {
                    "name": "containerInsights",
                    "value": "enabled"
                }
            ],
[...]
To enable Container Insights by default on new ECS clusters, update your containerInsights account setting as described in the AWS documentation.
To enable Container Insights on an existing ECS cluster, you have to use the CLI; it’s not possible to do this via the ECS console. The sample code below shows how you would use the update-cluster-settings command to enable Container Insights on an ECS cluster named my-ecs-cluster:
aws ecs update-cluster-settings --cluster my-ecs-cluster --settings name=containerInsights,value=enabledThe CloudWatch console
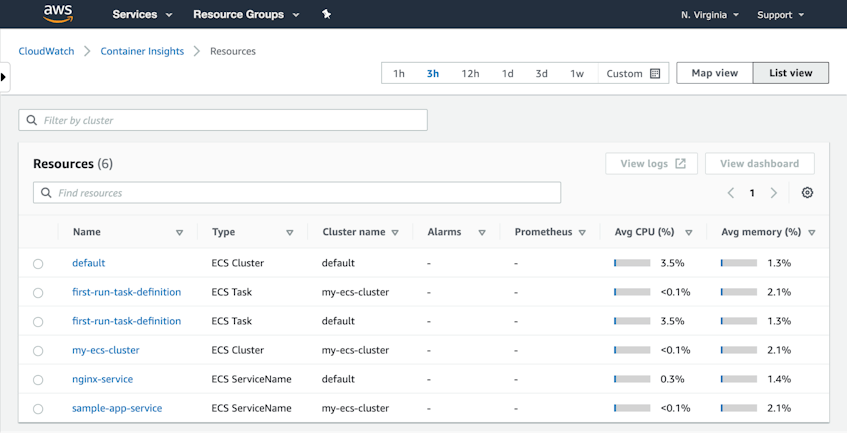
The built-in Container Insights dashboard displays metrics from your ECS cluster. In the CloudWatch console, click the Resources link to see a list of your ECS tasks, services, and clusters. Each row in the table shows you performance metrics from your ECS resources. (You can also see your EKS resources here, but only if they’re backed by EC2; Fargate-backed EKS clusters are not monitored by Container Insights.)
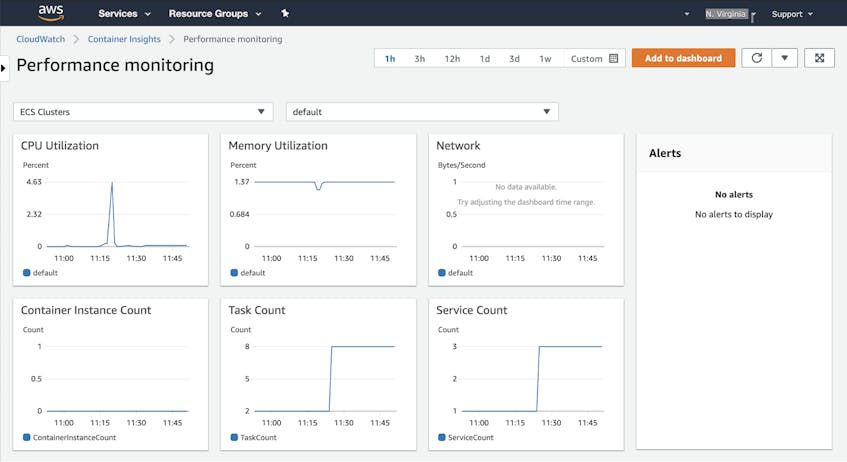
Click the Performance Monitoring link in the CloudWatch console to see graphs of the resource usage and state of your tasks, services, and clusters. The screenshot below shows a Container Insights dashboard that graphs CPU, memory, and network performance metrics from all the tasks in a Fargate-backed ECS cluster.
To save this view to your own dashboard, click Add to dashboard in the upper-right corner of the page. All graphs visible on the Performance Monitoring view will be added to your dashboard. Once you’ve added them, you can change the size and location of the graphs or add new graphs to show related data that you want to correlate in a single view.
CloudWatch Alarms
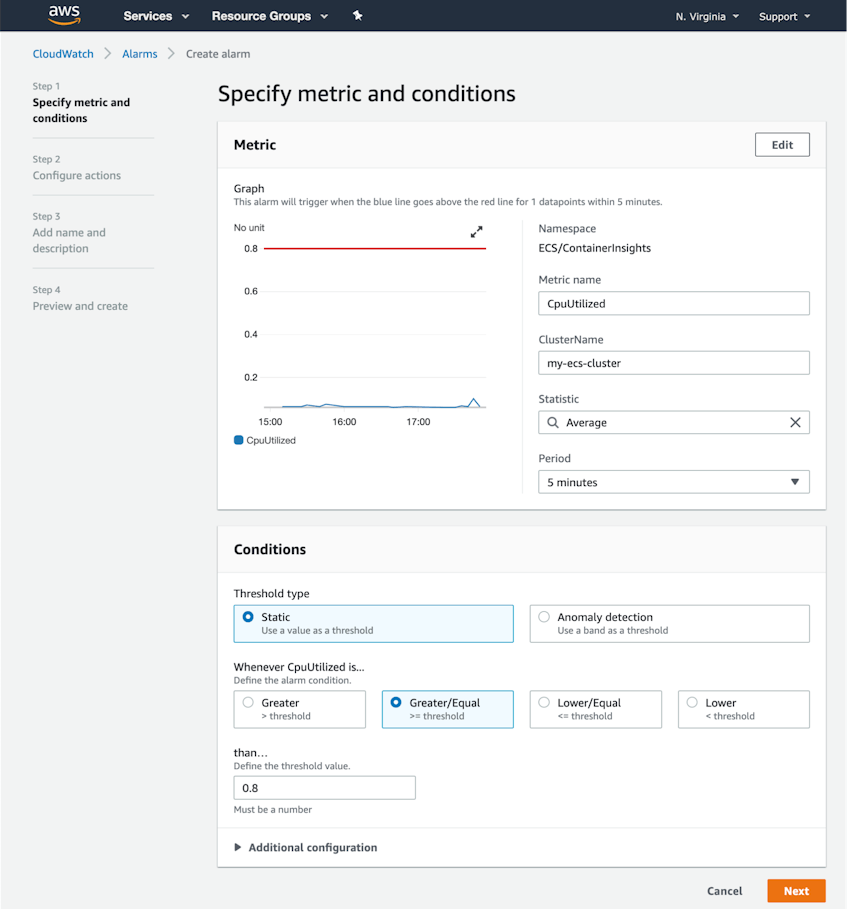
CloudWatch Alarms can notify you if the value of any CloudWatch metric crosses a specific threshold. For example, you can automatically get notified if the value of the MemoryUtilized metric in the ECS/ContainerInsights namespace rises above 80 percent.
The screenshot below shows the CloudWatch Create Alarm screen. We’ve defined an alarm that will trigger if the average CpuUtilized value across all the workloads on our cluster is greater than or equal to 0.8 vCPUs for five minutes.
The AWS CLI
The CloudWatch UI is helpful for exploring your metrics, but if you need to collect metrics programmatically—for example, to ingest into your own monitoring applications—you can use the AWS CLI. Once you’ve installed the CLI, you have a single tool you can use to interact with many AWS services. In this section, we’ll show you some useful commands for gathering monitoring data from ECS.
You can use the list-metrics command to see the metrics that CloudWatch has collected in a given namespace. For example, the following command returns a list of metrics from the ECS/ContainerInsights namespace:
aws cloudwatch list-metrics --namespace ECS/ContainerInsightsThe output of this command is a JSON object that includes every metric that Container Insights has collected in this namespace over the last two weeks. If no data is available for a particular metric, the output of list-metrics won’t mention that metric. A sample list-metrics output is shown below.
{
    "Metrics": [
[...]
        {
            "Namespace": "ECS/ContainerInsights",
            "MetricName": "CpuReserved",
            "Dimensions": [
                {
                    "Name": "ClusterName",
                    "Value": "my-ecs-cluster"
                }
            ]
        },
        {
            "Namespace": "ECS/ContainerInsights",
            "MetricName": "MemoryUtilized",
            "Dimensions": [
                {
                    "Name": "ClusterName",
                    "Value": "my-ecs-cluster"
                }
            ]
        },
[...]
Each metric has multiple dimensions, which you can use to filter the results returned by CloudWatch, limiting the scope of the metrics you receive. For example, we can use the sample get-metric-statistics command below to get the MemoryReserved metric only from the service with a ClusterName value of my-ecs-cluster. In addition to specifying the namespace, metric name, and dimensions, this command includes the following required parameters:
start-timeandend-timeto define the timespan of events to query (in UTC format)periodto define the metric aggregation period in secondsstatisticsto define how the metrics are to be aggregated (e.g.,SampleCount,Average,Sum,Minimum, orMaximum)
aws cloudwatch get-metric-statistics --namespace ECS/ContainerInsights --metric-name MemoryReserved --start-time 2020-08-07T00:00:00Z --end-time 2020-08-07T16:00:00Z --period 120 --dimensions Name=ClusterName,Value=my-ecs-cluster --statistics AverageYou can also access CloudWatch programmatically by using the AWS SDK to call the CloudWatch API. This makes it easy for you to scale your monitoring by building it into custom applications you create using your preferred languages and tools. See the AWS documentation for more information.
The ECS task metadata endpoint
Each ECS task exposes an endpoint where you can access data that describes the task and the resource usage of each container in the task. You can query the ECS task metadata endpoint to see the status of the task as well as the current and desired status of its containers. You can also see CPU and memory limits defined at the task and container level as well as each container’s network, memory, I/O, and CPU statistics, which have been collected from the Docker API. (Container Insights collects similar resource metrics but at the task and cluster level rather than for each individual container. If you need per-container resource metrics from ECS—or if you’re already using scripts that consume the output of the Docker API—the ECS task metadata endpoint may be valuable to you even if you’re also using Container Insights.)
The task metadata endpoint is provided by the ECS container agent, which is installed on each Fargate instance that runs your tasks. The endpoint is enabled by default on Fargate version 1.4.0 and later. For information on Fargate versions and guidance on how to migrate to the current version, see the AWS documentation.
To fetch metrics from the ECS task metadata endpoint, you can add a dedicated container to your task and create an entrypoint for that container that queries the task metadata endpoint. See our ECS monitoring series and this GitHub project for more information.
Collecting metrics from EKS on Fargate
Metrics from EKS workloads running on Fargate are not available in CloudWatch, but you can monitor your EKS clusters with open source monitoring tools. In this section, we’ll show you two tools you can use—kubectl and Prometheus—to view metrics from your Fargate-backed EKS clusters.
The Kubernetes Metrics API
The Kubernetes Metrics Server provides data about the resource requests and limits of your Kubernetes pods, including EKS pods deployed on Fargate. It exposes these metrics via the Metrics API, which you can access using kubectl commands.
Install the Metrics Server
First, deploy the Kubernetes Metrics Server into your EKS cluster. Then you can use kubectl commands to query the Metrics API. kubectl is a command-line utility that allows you to interact with your Kubernetes clusters. If you’re not already using kubectl, follow the guidance in the Kubernetes documentation to install and configure it.
Use kubectl to get metrics
You can use the kubectl describe command to see details about your pods and resource metrics from the compute resources they run on.
To see a list of the pods in your cluster, use the command kubectl get pods. To see details about one of your cluster’s pods, use kubectl describe pod <MY_POD_NAME>. The example command below returns details about the pod named my-fargate-pod.
kubectl describe pod my-fargate-podThe output of this command is shown below. The pod named my-fargate-pod hosts a single container named my-container. That container’s CPU limit is 3.5 vCPUs (or 3,500 millicpu cores) and its CPU request is 3 vCPUs. The container also has a memory limit of 2 Gi and a memory request of 1 Gi.
Name:                 my-fargate-pod
Namespace:            default
Priority:             2000001000
Priority Class Name:  system-node-critical
Node:                 fargate-ip-192-168-85-85.ec2.internal/192.168.85.85
Start Time:           Wed, 08 Jul 2020 09:33:19 -0600
Labels:               eks.amazonaws.com/fargate-profile=fp-default
Annotations:          kubernetes.io/psp: eks.privileged
Status:               Running
IP:                   192.168.85.85
IPs:
  IP:  192.168.85.85
Containers:
  my-container:
    Container ID:  containerd://81e75f41f17f0e6262f8909d8446b929493fbaa6a642d35d6d79142ccca8b0f1
    Image:         vish/stress
    Image ID:      docker.io/vish/stress@sha256:b6456a3df6db5e063e1783153627947484a3db387be99e49708c70a9a15e7177
    Port:          <none>
    Host Port:     <none>
    Args:
      -cpus
      2
    State:          Running
      Started:      Wed, 08 Jul 2020 09:33:22 -0600
    Ready:          True
    Restart Count:  0
    Limits:
      cpu:     3500m
      memory:  2Gi
    Requests:
      cpu:        3
      memory:     1Gi
[...]
You can list the compute resources running in your cluster with kubectl get nodes, and then query details from any specific compute resource using kubectl describe node <FARGATE_COMPUTE_RESOURCE_NAME>. The output of this command includes data about the compute resource’s capacity—including its total CPU and memory resources—and the amount of resources reserved by running pods. The Capacity section shows that this Fargate compute resource has 4 vCPUs and 16 GB (16423900 Ki) of memory. (The memory value in the Allocatable section of the output shows that only a portion of memory is available for use by pods.) Of these resources, 3 vCPUs are requested by the pod named my-fargate-pod, as is 1 Gi of memory.
Name:               fargate-ip-192-168-85-85.ec2.internal
[...]
Capacity:
  attachable-volumes-aws-ebs:  39
  cpu:                         4
  ephemeral-storage:           25671908Ki
  hugepages-1Gi:               0
  hugepages-2Mi:               0
  memory:                      16423900Ki
  pods:                        1
Allocatable:
  attachable-volumes-aws-ebs:  39
  cpu:                         4
  ephemeral-storage:           23659230374
  hugepages-1Gi:               0
  hugepages-2Mi:               0
  memory:                      16321500Ki
  pods:                        1
[...]
Non-terminated Pods:          (1 in total)
  Namespace                   Name              CPU Requests  CPU Limits   Memory Requests  Memory Limits  AGE
  ---------                   ----              ------------  ----------   ---------------  -------------  ---
  default                     my-fargate-pod    3 (75%)       3500m (87%)  1Gi (6%)         2Gi (12%)      9m54s
Allocated resources:
  (Total limits may be over 100 percent, i.e., overcommitted.)
  Resource                    Requests  Limits
  --------                    --------  ------
  cpu                         3 (75%)   3500m (87%)
  memory                      1Gi (6%)  2Gi (12%)
  ephemeral-storage           0 (0%)    0 (0%)
  hugepages-1Gi               0 (0%)    0 (0%)
  hugepages-2Mi               0 (0%)    0 (0%)
  attachable-volumes-aws-ebs  0         0
[...]
The kubectl utility can also fetch metrics generated by cAdvisor, which runs as part of the kubelet on each compute resource. The example command below uses kubectl to call the cAdvisor endpoint to display metrics from a Fargate compute resource.
kubectl get --raw /api/v1/nodes/fargate-ip-192-168-254-5.us-west-1.compute.internal/proxy/metrics/cadvisorThe --raw option in this command tells cAdvisor to return all available metrics in Prometheus format. The output includes metrics that illustrate how the pod is using the CPU, memory, network, and file system resources, as well as the total memory (in bytes) and CPU (in cores) capacity of the Fargate compute resource. An excerpt from the output of this command is shown below.
# HELP cadvisor_version_info A metric with a constant '1' value labeled by kernel version, OS version, docker version, cadvisor version & cadvisor revision.
# TYPE cadvisor_version_info gauge
cadvisor_version_info{cadvisorRevision="",cadvisorVersion="",dockerVersion="Unknown",kernelVersion="4.14.186-146.268.amzn2.x86_64",osVersion="Amazon Linux 2"} 1
# HELP container_cpu_cfs_periods_total Number of elapsed enforcement period intervals.
# TYPE container_cpu_cfs_periods_total counter
container_cpu_cfs_periods_total{container="",id="/kubepods/burstable/podf0bf8c34-ff5f-4671-86b3-a0123f0123ab",image="",name="",namespace="default",pod="nginx-demo-fargate-8654687fff-01a01"} 21478 1598032552553
container_cpu_cfs_periods_total{container="datadog-agent",id="/kubepods/burstable/podf0bf8c34-ff5f-4671-86b3-a0123f0123ab",image="docker.io/datadog/agent:latest",name="abcdef0123456789",namespace="default",pod="nginx-demo-fargate-0123456fff-76v97"} 21469 1598032547346
container_cpu_cfs_periods_total{container="nginx-demo-ctr",id="/kubepods/burstable/podf0bf8c34-ff5f-4671-86b3-a0123f0123ab",image="docker.io/library/nginx:latest",name="abcdef9876543210",namespace="default",pod="nginx-demo-fargate-8654687fff-01a01"} 65 1598032551002
[...]
# HELP machine_cpu_cores Number of CPU cores on the machine.
# TYPE machine_cpu_cores gauge
machine_cpu_cores 4
# HELP machine_memory_bytes Amount of memory installed on the machine.
# TYPE machine_memory_bytes gauge
machine_memory_bytes 1.6332972032e+10
To see the current resource usage of a pod, use kubectl top. The command shown here checks the CPU and memory usage of each pod in the cluster:
$ kubectl top pods

NAME                   CPU(cores)   MEMORY(bytes)
cpu-demo-fargate       487m         1Mi
memory-demo-fargate    67m          151Mi
no-resources-fargate   68m          151Mi
Monitoring EKS with Prometheus
You can also use the Prometheus server to collect cluster and resource metrics from Kubernetes, including EKS clusters running on Fargate. Prometheus scrapes metrics from kube-state-metrics (for information about Kubernetes objects) and cAdvisor (for information about resource usage).
On a self-hosted Kubernetes cluster or an EKS cluster running on EC2, Prometheus can also collect node-level metrics from Node Exporter. But Node Exporter runs as a DaemonSet, which is unsupported on Fargate.
Prometheus stores metrics in a timeseries database so you can visualize them in dashboards using Grafana or other visualization tools. For more information on using Prometheus to monitor EKS on Fargate, see the EKS documentation. And check out our guides to EKS monitoring and Kubernetes monitoring for more information about using the Kubernetes Metrics API and kube-state-metrics.
Collecting logs from ECS and EKS on Fargate
In addition to metrics, you’ll also want to collect logs to gain even greater visibility into the health and performance of your containerized applications. In this section, we’ll show you how you can use CloudWatch Logs to collect and view logs from ECS on Fargate and EKS on Fargate, and how to use native Kubernetes tools to view logs from your EKS clusters.
CloudWatch Logs and CloudWatch Logs Insights
CloudWatch Logs collects logs from many AWS services and stores them in discrete log streams that you can aggregate into log groups.
In this section, we’ll show you how to start collecting logs from both ECS and EKS on Fargate. We’ll cover:
- Collecting logs from ECS on Fargate using the
awslogsdriver (with CloudWatch Logs) - Collecting logs from ECS on Fargate using Fluent Bit (for both AWS and non-AWS logging backends)
- Collecting logs from EKS on Fargate with CloudWatch Logs
Finally, we’ll also look at how to use CloudWatch Logs Insights to query and analyze logs from your AWS services.
Collecting logs from ECS on Fargate using the awslogs driver
You can configure your ECS task to use the awslogs log driver to send logs to CloudWatch Logs. To do this, either update your task definition to specify the awslogs driver or use the ECS console. We will cover both methods below.
You can add a logConfiguration element to a new or existing task definition to specify the log driver and log configuration options for your task. The ECS task definition excerpt shown below configures a container to use the awslogs driver to forward logs to CloudWatch Logs. The logConfiguration element includes the following options:
awslogs-groupto designate the CloudWatch Logs log group where the logs will be collectedawslogs-regionto designate the AWS region where the logs will be collectedawslogs-stream-prefixto define a prefix string which CloudWatch Logs will automatically add to the name of the log streamawslogs-create-groupto enable ECS to create the log group if necessary
[...]
    "containerDefinitions": [
        {
            "name": "fargate-app",
            "image": "httpd:2.4",
            "logConfiguration": {
                "logDriver": "awslogs",
                "options": {
                    "awslogs-group": "awslogs-https",
                    "awslogs-region": "us-east-1",
                    "awslogs-stream-prefix": "awslogs-example",
                    "awslogs-create-group": "true"
                }
            }
[...]
        }
If you’re using the ECS console to create or update your task, you can specify your logging configuration in the container definition, as shown in the screenshot below.

See the AWS documentation for more information about using the awslogs log driver to collect ECS logs.
Collecting ECS logs with Fluent Bit and FireLens for Amazon ECS
FireLens for Amazon ECS enables you to use Fluent Bit to send ECS logs to CloudWatch Logs and even to non-AWS logging backends. (You can also use Fluentd with FireLens, but AWS recommends using Fluent Bit instead.)
To send logs from any ECS task to CloudWatch using Fluent Bit, create a Fluent Bit container in your task that will route logs to your backend. Then in your application container, create a log configuration that references the awsfirelens driver to pass application logs to FireLens for routing to CloudWatch.
The configuration of your log router also needs to specify a CloudWatch Logs log group, a region, a prefix string to be automatically prepended to the name of the log stream, and—if necessary—a directive to enable ECS to create the log group. The example below is an excerpt of an ECS task definition file that includes a logging configuration in the definition for the container named fargate-app.
[...]
    "containerDefinitions": [
        {
            "name": "fargate-app",
            "image": "httpd:2.4",
            "logConfiguration": {
                "logDriver": "awsfirelens",
                "options": {
                    "awslogs-group": "awslogs-https",
                    "awslogs-region": "us-east-1",
                    "awslogs-stream-prefix": "awslogs-firelens-example",
                    "awslogs-create-group": "true"
                }
            }
[...]
        }
The AWS documentation includes sample ECS task definitions that illustrate the configurations for forwarding ECS logs to CloudWatch Logs and Amazon Kinesis Data Firehose. In Part 3 of this series, we’ll show you how to configure your ECS tasks to route logs to Datadog.
Collecting logs from EKS on Fargate with Fluent Bit
You can also use Fluent Bit to route EKS logs to CloudWatch Logs. Fluent Bit is built in to EKS, and it operates in a dedicated namespace—aws-observability—allowing it to collect logs from applications in any other namespaces in the cluster.
To configure Fluent Bit to send your logs to CloudWatch, create a Kubernetes ConfigMap that specifies CloudWatch Logs as its output. Your ConfigMap will also specify the log group, region, prefix string, and whether to automatically create the log group, as shown in the example below.
kind: ConfigMap
apiVersion: v1
metadata:
  name: aws-logging
  namespace: aws-observability
data:
  output.conf: |
    [OUTPUT]
        Name cloudwatch_logs
        Match   *
        region us-east-1
        log_group_name awslogs-https
        log_stream_prefix awslogs-firelens-example
        auto_create_group On
You can also use Fluent Bit to send EKS logs to Elasticsearch, Kinesis Data Firehose, or a third-party logging backend. For more information about routing EKS logs with Fluent Bit, see the EKS documentation.
You can use CloudWatch Logs for EKS control plane logging, too. To learn how to collect logs from each of the components in the Kubernetes control plane within your EKS cluster, see the AWS documentation on EKS control plane logging.
Later in this post we’ll describe how you can also view EKS logs via the kubectl logs command.
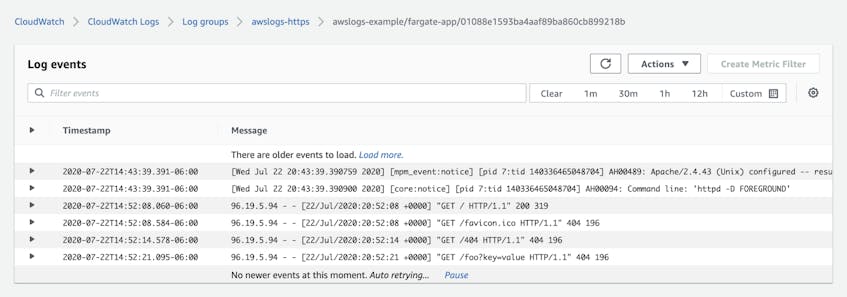
Viewing logs in CloudWatch
The CloudWatch Logs console lets you explore logs you’ve collected from ECS, EKS, and any other AWS services you’re using. You can select a log group to explore, then filter based on time and keyword to view the logs that are useful to you. The screenshot below shows a view of the awslogs-https log group in the CloudWatch Logs console.
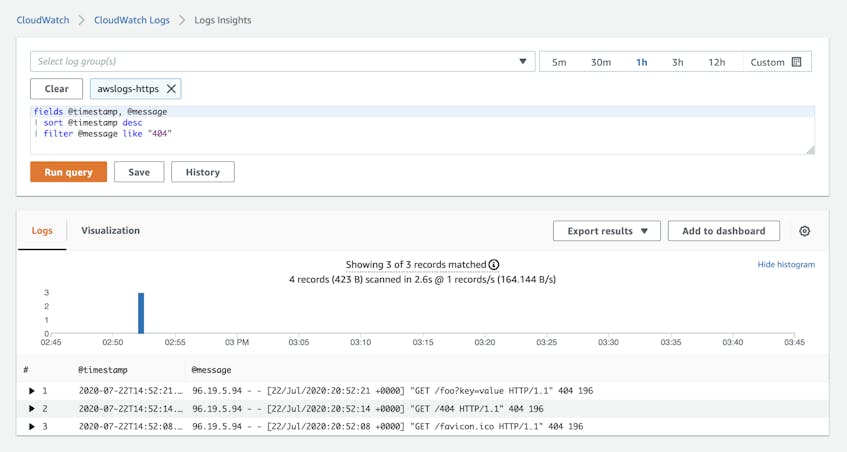
Querying logs in CloudWatch Logs Insights
CloudWatch Logs Insights allows you to query and analyze the logs you’ve collected in CloudWatch. You can compose queries to search and filter logs from one or more log groups based on strings and regular expressions. The screenshot below shows a CloudWatch Logs Insights query that searches for logs in the awslogs-https log group that contain the string “404.”
Use kubectl to get Kubernetes logs from EKS
In an earlier section, we showed you how to use Kubernetes’ command-line tool—kubectl—to view metrics from your cluster. You can also use kubectl to view logs emitted by your containerized applications.
kubectl logs reads logs that your application writes to stdout or stderr. The output looks similar to this:
$ kubectl logs cpu-demo-fargate

I0807 20:03:43.940596       1 main.go:26] Allocating "0" memory, in "4Ki" chunks, with a 1ms sleep between allocations
I0807 20:03:43.940651       1 main.go:39] Spawning a thread to consume CPU
I0807 20:03:43.940659       1 main.go:39] Spawning a thread to consume CPU
I0807 20:03:43.940666       1 main.go:29] Allocated "0" memory
In the previous section, we described using Fluent Bit to route EKS logs to CloudWatch logs, which requires that your application writes logs to a file. It’s possible to configure your application in a way that allows you to use both kubectl logs and Fluent Bit, and you could even log different information to each. For example, if your application logs more detailed information to stdout than to your log file, you can use kubectl logs for debugging and troubleshooting and use CloudWatch Logs to analyze request volume and error rates. See the AWS blog for more information about these logging methods. And for more information about Docker logging, see our best practices guide.
Bring it all together with Datadog
The monitoring tools we’ve shown you in this post collect ECS and EKS data to help you understand the performance of your Fargate-backed clusters. To gain a full understanding of how all your workloads are performing—and how they’re using Fargate resources over time—you need to visualize and alert on comprehensive monitoring data in a single platform. In Part 3, we’ll show you how to use Datadog to collect, analyze, and alert on monitoring data from Fargate and all the other technologies in your stack.
Acknowledgments
We would like to thank Jonah Jones at AWS and Kyle Allen at CBT Nuggets for their technical review of this post.
