Testing plays a key role in development. By continuously monitoring application workflows and features, your tests can surface broken functionality before your customers do. There are several different types of tests, but they all predominantly fall into one of two categories: pre-production and post-production. Traditional quality models focus on testing new functionality closer to its release to production. But organizations are trying to move away from this model in favor of “shift-left” testing, which verifies functionality earlier in the development cycle in order to find and fix issues faster.
The shift-left model can incorporate any type of test—from code-level unit and API tests to UI-level browser tests—though many organizations prioritize browser tests in order to quickly expand their test suites. These types of tests interact with your application’s UI, mimicking customer interactions with key workflows like creating a new account or adding items to a cart. But creating tests with meaningful coverage can be more challenging than teams initially expect, and the infrastructure for executing them becomes more complex as an application grows.
As you develop your application, it’s important to create a plan for building test suites that provide appropriate coverage and are easy to adopt and maintain in the long term. In this guide, we’ll walk through some best practices for creating tests, including:
- Defining your test coverage
- Building efficient, meaningful tests
- Designing coherent and easy-to-navigate test suites
- Creating notifications that enable teams to respond to issues faster
Along the way, we’ll show how Datadog can help you follow these best practices and enable you to easily create and organize your tests.
Define your test coverage
Before you start creating tests, it’s important to consider which application workflows you should test. Teams often start with goals to create tests for every feature to reach 100 percent test coverage. This creates suites that are often too large to maintain efficiently; not every workflow is a good fit for E2E test suites.
Test coverage should be representative of your users and how they interact with your application. This requires identifying the commonly used application workflows versus the less popular ones, so you can scope test suites to include only the workflows that bring the most value to your business. This approach will help you strike a better balance between test coverage and maintainability.
Depending on the industry, some of these key application workflows could include:
- Creating or logging into an account
- Booking a flight
- Adding items to a cart and checking out
- Viewing a list of employees for your company
- Adding direct deposit to an account in an internal payroll system
To capture data about the common workflows for your application, you can use tools such as real user monitoring (RUM). For example, you can use Datadog’s RUM product to perform analytics on your application and determine where you should focus testing. This could include the top visited URLs for your application as well as which browsers and devices visitors are using. This gives you a starting point for which user journeys you should include in your E2E test suite.
In addition to testing the more popular workflows, it’s important to create tests for flows that are not used as often but are still critical to your users’ experience. This may include recovering an account password or editing a profile. Since these flows are not used as often, you may not be aware of broken functionality until a customer reports it. Creating tests for these flows enables you to identify broken functionality before a customer does.
Once you know which application workflows need coverage, you can start building efficient test suites. We’ll show you how in the next section.
Build meaningful tests for key application workflows
How you approach creating new end-to-end tests will determine if they can adequately test your critical application workflows. This process requires incorporating the right DOM elements (e.g., an input field or button) and commands for executing the necessary workflow steps, as well as assertions that confirm an application’s expected behavior. Without a clear plan outlining how to approach a specific workflow, tests can easily become complex, with a large number of unnecessary steps, dependencies, and assertions. This increases test flakiness and execution times, making it more difficult to troubleshoot and respond to issues in a timely manner.
There are a few best practices you can follow that will ensure test suites are efficient, easy to understand for new team members, and will reduce your team’s average mean time to repair (MTTR):
- Break workflows down with smaller tests
- Create meaningful assertions to verify expected behavior
- Built tests that adapt to factors out of your control
- Create idempotent tests to maintain the state of your applications
We’ll walk through each of these best practices in more detail next.
Break workflows down with focused tests
It’s important to create tests that do not duplicate steps and stay within the scope of the application workflow that is being tested. Separating workflows into smaller, focused tests helps you stay within scope, reduce points of maintenance, and troubleshoot issues faster. For example, a test that is meant to verify functionality for a checkout workflow should not include the steps for creating a new account. If that test fails, you do not want to spend time troubleshooting whether the failure occurred at checkout or at account creation.
Ensuring that every single step of a test case closely follows the steps of the tested workflow, minimizing the number of unrelated steps, and adding the right assertions to verify behavior are key to creating focused tests. Even simple tests, with a few meaningful steps and assertions, can provide a lot of value for testing your applications.
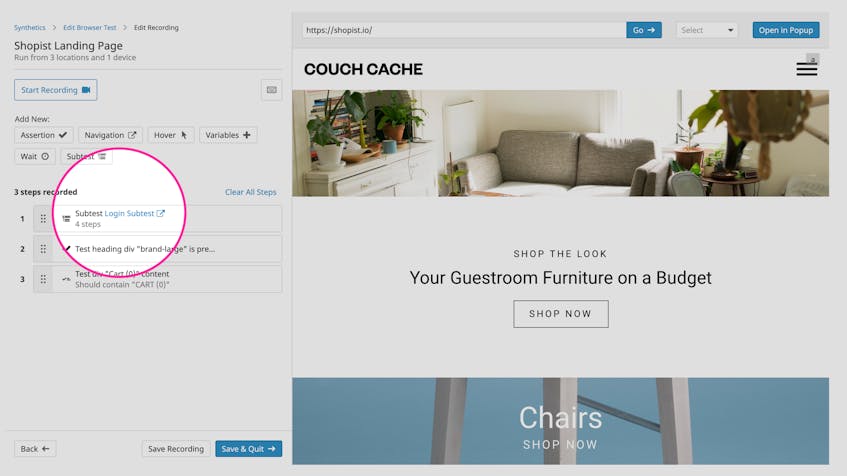
You can incorporate the DRY principle (i.e., “don’t repeat yourself”) while creating new tests to stay within scope and minimize step duplication. One way you can do this in Datadog is by creating reusable components with subtests. Subtests group reusable steps together so that you can use them across multiple tests. For example, you can create a “login” subtest that includes the steps required to log into an application and use it in your other tests.
You could also create subtests to cover other key workflows, such as adding multiple items to a cart, or removing an item from the cart before proceeding to checkout. An added benefit to creating more reusable components is you can incorporate multiple subtests into a single test. With this, you only have to update one subtest instead of multiple tests when a workflow changes. This also drastically cuts down on the time it takes to create new steps for tests, enabling you to focus on capturing the steps for new or updated functionality.
Create meaningful assertions to verify expected behavior
Another aspect of building efficient test suites is ensuring tests can assert (or verify) important application behavior. Test assertions are expressions (or steps) that describe workflow logic. They add value to tests by mimicking what users expect to see when they interact with your applications. For example, an assertion can confirm that a user is redirected to the homepage and sees a welcome message after they log into an application.
There are several assertions that are commonly used in tests:
- An element has (or does not have) certain content
- An element or text is present (or not present) on a page
- A URL contains a certain string, number, or regular expression
- A file was downloaded
- An email was sent and includes certain text
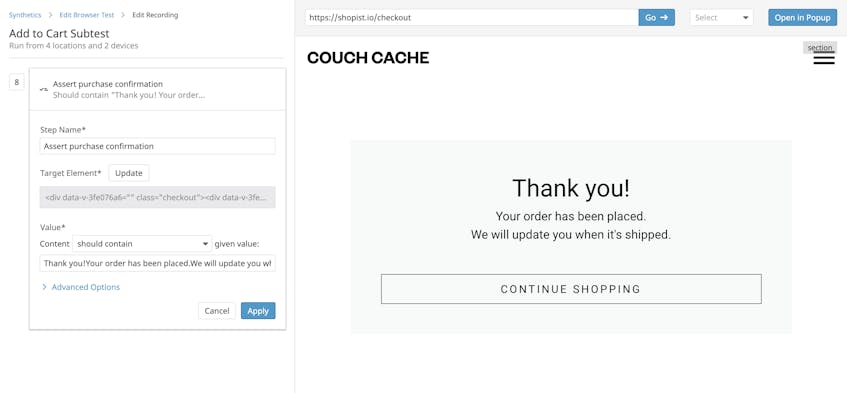
It’s important to only include assertions that mimic what the user would do or would expect to happen for the tested workflow. A test for checkout functionality, for instance, only needs to include assertions that are relevant to checking out, such as verifying a purchase confirmation.
In the simple example above, we’re using one of Datadog’s out-of-the-box assertions to verify that users will see a confirmation after purchasing an item from an ecommerce site. With this assertion, the test looks for a specific element on the page and verifies that it contains the expected text. For this example, if Datadog is not able to find the element, or if the text isn’t present, the test will fail.
Build tests that automatically adapt to factors out of your control
Tests often timeout and fail if an application takes too long to load. Load times can be affected by factors such as an unexpected network blip or an unusual surge in traffic that overloads application servers. These inconsistencies can cause tests to generate false positives, decreasing their ability to reliably notify teams of legitimate issues. And hard coding wait steps for tests, a common method for troubleshooting these types of failures, can make them more unreliable.
A best practice for ensuring tests can adapt to load time fluctuations is to design them to automatically wait for a page to be ready to interact with before executing (or retrying) a test step. By doing this, tests will execute or retry a step only when needed (e.g., when the application has loaded). This not only eliminates the need for manually adding wait steps but also allows you to focus on legitimate production issues.
For example, Datadog’s browser tests are designed to regularly check if a page is ready to interact with before trying to complete the step (e.g., locate an element, click on a button, etc.). By default, this verification process continues for 60 seconds, though you can adjust this value. If Datadog can’t complete the step within this period, it marks it as failed and triggers an alert.
Adding these types of steps to your tests helps minimize failures that are often caused by network blips, but there are other factors that contribute to tests generating false positives. Next, we’ll briefly look at how data can affect a test’s ability to accurately verify application behavior.
Maintain the state of your applications with idempotent tests
Tests rely on clean data in order to recreate the same steps with each and every test execution, so it’s important to build dedicated configurations (e.g., login credentials, environments, cookies) that are only used by your test suites.
Part of the process for building these configurations is creating tests that are idempotent, which means that tests leave the state of your application and test environments the same before and after the test run. A test that focuses on adding multiple items to a cart, for example, should have a mechanism to delete those items from the cart afterward. This cuts down on the number of test orders pending in your system and ensures your application is always available for customers.
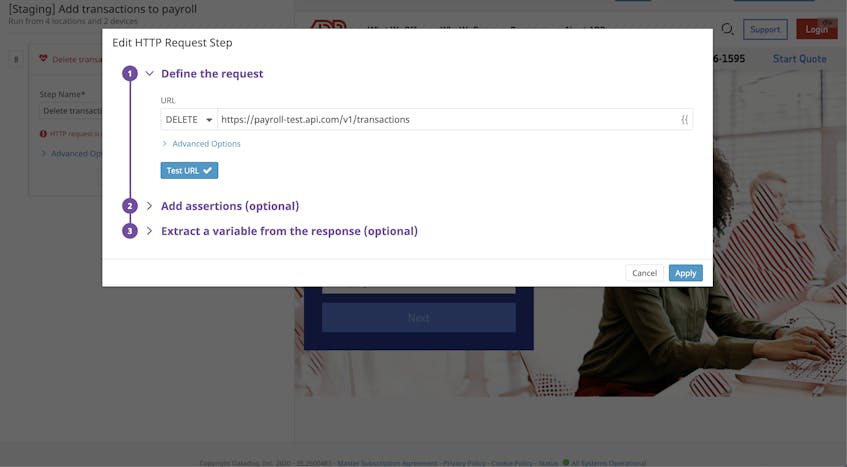
Datadog’s built-in HTTP request steps can help you maintain idempotency and minimize data dependencies between tests. For example, if you have a test that creates new test transactions for an internal payroll system, you can use the HTTP request step to automatically delete those transactions from the database at the end of a test.
You can also use subtests to clean up data after a test run. These methods provide a quick and easy way to limit the number of times tests fail simply due to environment or data issues.
In the last few sections, we looked at best practices for creating focused and valuable test cases. Next, we’ll look at test suites as a whole and how you can organize them by testing environments and other key metadata.
Design coherent test suites
- Define test configurations based on testing environments
- Use metadata to organize and quickly identify your tests
Configure tests by environment
Each environment you use to test functionality during the development process may require different configurations for running tests. For example, tests in a development environment may only need to run on one device, while tests in staging require several different types of devices. You can configure tests separately by environment to ensure that tests only run on what is needed for a single environment.
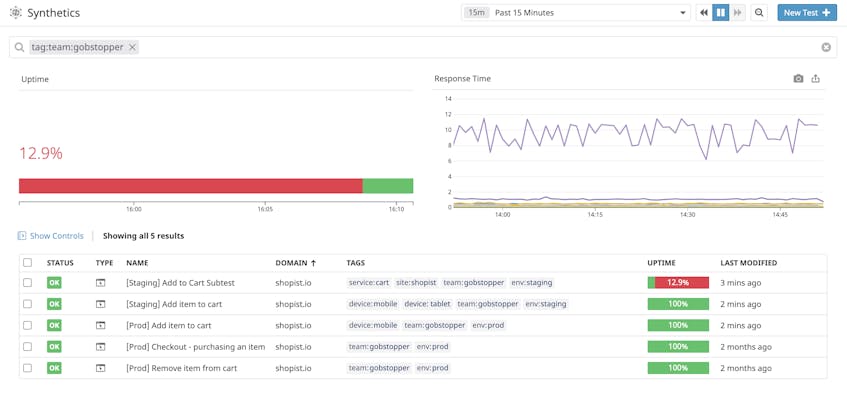
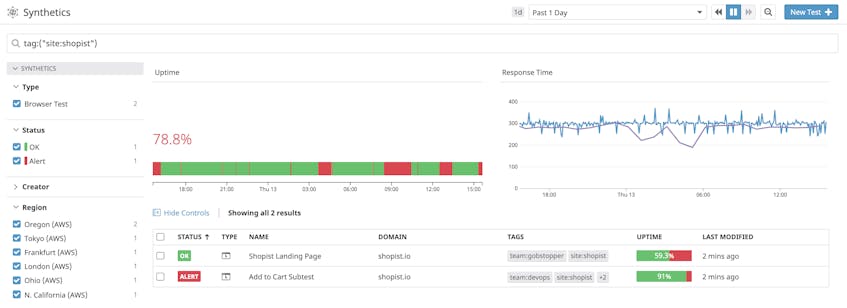
In the example list above, you can see tests for staging and production environments. The “[Staging] Add item to cart” test is configured to automatically run on more devices than the production tests. Note that each test includes the associated environment in the test title and as an environment tag. This helps you quickly search for and identify where tests run.
Adding your end-to-end tests to existing continuous integration (CI) workflows can further streamline the process for testing your code before it makes it to your staging or production environments. Datadog’s CI integration gives you more control over test configurations per environment, and enables you to easily override settings such as the starting URL, locations, and retry rules, and run a suite of tests as part of your CI scripts. For example, you can override the start URL to automatically use the environment variables configured for your CI environment. You can easily view the results of your tests directly in your CI tool (e.g., Jenkins, CircleCI, Travis) or in Datadog.
Organize tests by location, device, and more
Finding ways to organize and categorize tests is another key aspect of designing a coherent test suite. By developing a good organizational structure, you can easily manage your test suites as they grow, search for specific tests, and get a better picture of where they run. One way you can add structure to test suites is by incorporating metadata or tags such as the test type (e.g., browser, API), owner, and device. Tags like these provide more context for what is being tested, so you can quickly identify which application workflows are broken and reach out to the appropriate teams when a test fails.
Just as adding the environment in the test’s title helps you quickly identify where a test runs, tags also enable you to categorize tests with key attributes as soon as you create them.
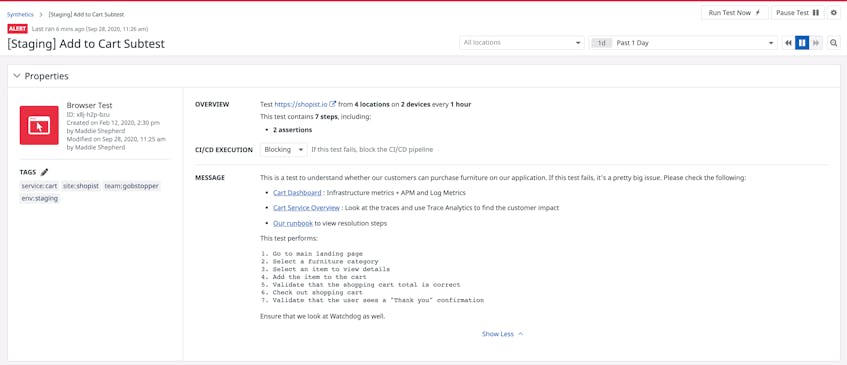
The example test configuration above uses tags to identify the environment, the feature and workflow to be tested, as well as the team developing the feature. Adding metadata or tags to your tests is especially useful if you manage a large suite of browser tests and only need to review a subset of them. For example, you can use the team tag to search for and run tests owned by a team that developed a new feature or a site tag to find all of the tests associated with a specific website.
We’ve walked through a few ways you can streamline and build efficient test suites at a high level. Another important aspect of creating tests involves sending notifications so you can be alerted on their status in a timely manner.
Create notifications that enable teams to respond faster
Regardless of how you structure your tests or where you run them, it’s important for the right team to be able to quickly assess test failures as well as know when test suites pass. For example, if you are testing a fix for a critical service in production, then engineers will need to know the state of your tests as soon as possible. If all your tests pass, then the team can safely move forward with the deployment. If there are failures, then they need to be notified as soon as possible to quickly troubleshoot.
Test reports are often difficult to analyze, especially as you add more tests to a suite. And if you run tests across multiple devices, you may have to look at several different reports to find the failures for each device. This means you spend more time sifting through test results than finding and fixing the issue.
You can streamline the process for reviewing test results by building notifications that automatically consolidate and forward results to the appropriate teams or channels, providing them with the necessary context for what was tested. For example, you can create notifications that include more contextual information about your tests (e.g., steps to take to investigate the issue, troubleshooting dashboard links) and send them over email or to a dedicated Slack channel. This ensures that you are notified as soon as tests complete, enabling you to quickly evaluate if you need to take further action.
The example above is a Datadog notification for a test that verifies cart functionality for an e-commerce application. The notification provides detailed information about what is being tested and links to a relevant dashboard, service overview, and runbook for troubleshooting test failures.
Start creating E2E tests today
In this post, we discussed some best practices for creating end-to-end tests that are efficient and provide the context needed to troubleshoot issues. We also looked at a few ways Datadog can help simplify the test creation process and organize your tests. You can check out Part 2 of our series to learn how to maintain your existing suite of tests or our documentation to learn more about creating E2E tests. If you don’t have an account, you can sign up for a free trial today.


