


Mike Stemle
Today’s guest blog is by Mike Stemle, a software engineer and Principal Architect for the Arc XP division of the Washington Post. In his role, Mike focuses on application security and large-scale architecture.
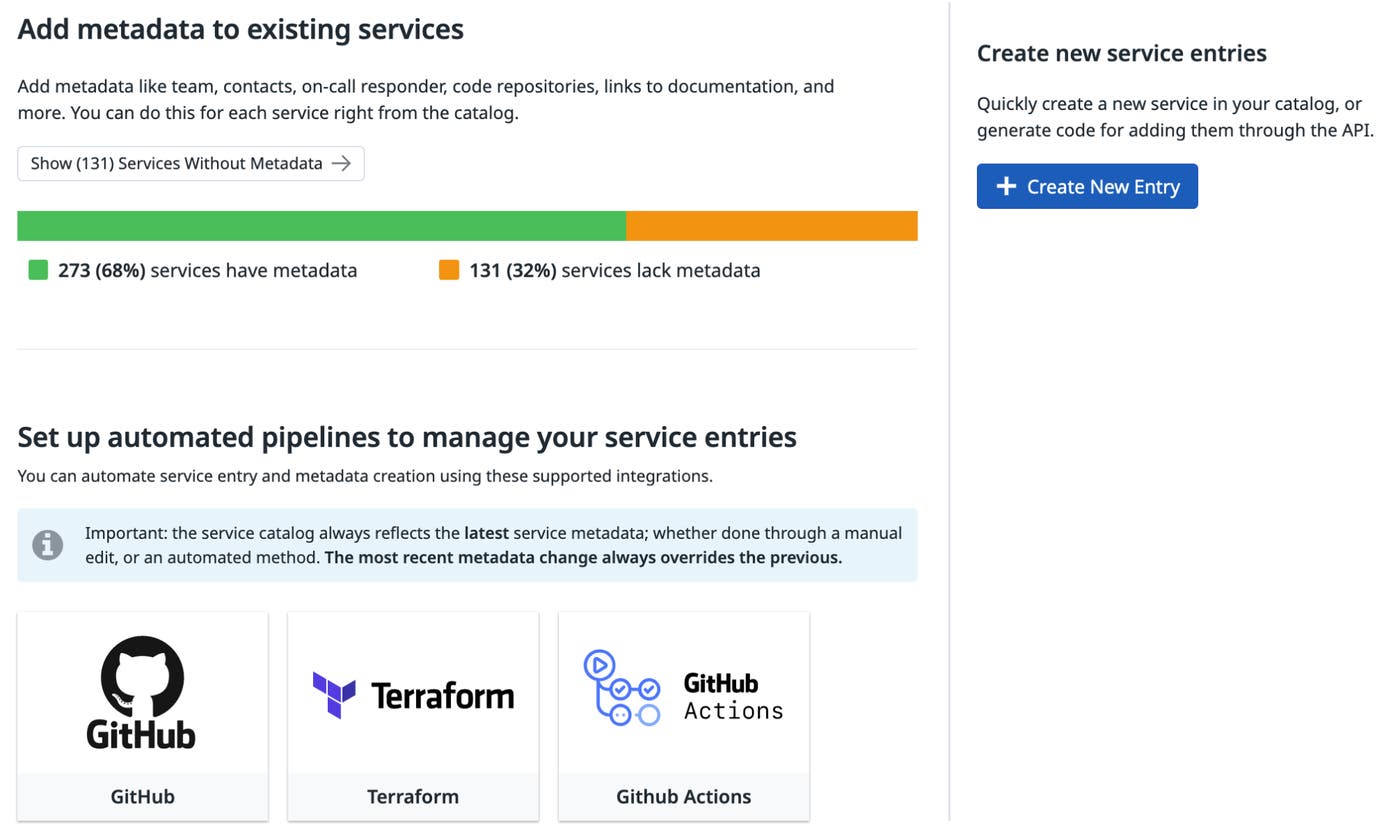
Anybody who works with me knows that I love the Datadog Software Catalog. Software Catalog is great for our teams because it puts service ownership and production support information right next to the metrics we use to detect outages and performance issues. Having all that information all in one place helps shift production support left, allowing us to proactively detect, mitigate, and resolve issues before they even make it to production—much in the same way we have seen with quality and security in the last 15 years.
But to get this full benefit from Software Catalog, you need to flesh out your organization’s service definitions. During incidents, it’s the definitions in Software Catalog that give you the most useful information, such as which team a service belongs to, where its documentation lives, and what repositories make up each service’s code.
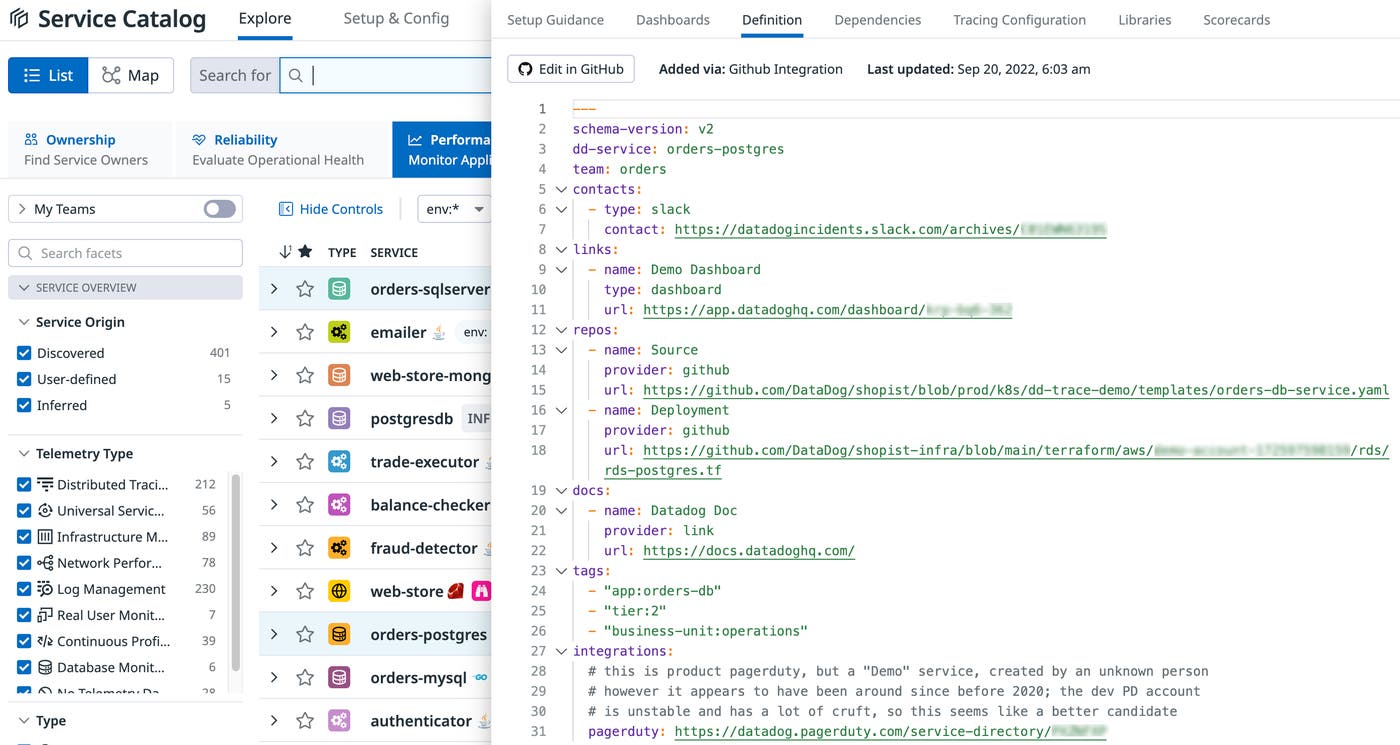
So how do you update your service definitions with all this information? You have a number of options. You can use the GitHub integration to feed metadata to Datadog via your GitHub repository. You can also manage service definitions through Terraform. Or you can manually supply definition details to the Service Definition API by using any HTTP client, such as the Node Fetch API.
For me, though, the best way to configure your service definitions is to use GitHub Actions to send your information to Datadog Software Catalog. This method uses an open source custom action I authored, called the Datadog Service Catalog Metadata Provider (DSCMP), which is available in the GitHub Marketplace. What’s great about the DSCMP is that it allows you to supply service details to Datadog without giving any third parties special access or permissions to your GitHub organization, and without needing to add another GitHub integration to monitor (did I mention I was involved in AppSec?). Using this custom action is easy, and as a bonus, it can help you promote best practices in your organization through technical controls.
For the rest of this article, I will cover how to use GitHub Actions together with the DSCMP, but first, the obligatory disclaimers: This article represents my own expertise and lived experience. In no way should this article be construed as conveying thoughts or opinions held by my employer—The Washington Post—or any of its related entities. Nor should this article be seen as speaking for Datadog, GitHub, or any of their related entities.
GitHub Actions: automated workflows, actions, and triggers
GitHub Actions is sometimes assumed to be a CI/CD platform only, but it has other uses. It can be used to automate virtually any set of tasks whenever a specified event occurs (such as a code push) in your GitHub repository. For example, I’ve also used GitHub Actions for code scanning with CodeQL, and for automated documentation generation and publication with GitHub Pages, Jekyll, and JSDoc. Sending service metadata to Datadog on a code push, therefore, is perfectly viable.
In GitHub Actions, the tasks you want to automate are defined in YAML files called workflows, saved in the .github/workflows directory in your repository. These workflows start with a trigger and include steps that point to predefined actions—such as the DSCMP. With the DSCMP, the code is already written for you, but you can also author your own custom actions to incorporate into your workflows or make available to others. If you’re interested in learning the basics about how to automate workflows with GitHub Actions, there are many articles and tutorials available (such as this one, this one, this one, or this one).
GitHub Actions secrets
Another thing that’s important to remember, if you want to use the DSCMP as your metadata provider, is that you’ll have to create an API and application key in Datadog. You’ll also want to store those keys as encrypted secrets in GitHub Actions. Doing so will allow the custom action to transmit your information to Datadog when the action is run.
Since I’m an AppSec-type person, I can’t help myself but to give you advice on secrets while we’re on this topic:
- Never commit any file to any
gitrepository with a secret or introduce secrets into your workflows or code files. - Use GitHub Secrets management for your secrets. Here’s GitHub’s documentation on Secrets in Actions. You’ll want to read this and understand it well.
(For more information about secrets in GitHub Actions, you can read the documentation here.)
Now that we’ve gotten these basics out of the way, let’s get nerdy.
Using the custom action
Because GitHub can already access the code for DSCMP, to use it, you simply need to point to it in your workflow YAML file with the following key-value pairs:
-
name: Datadog Service Catalog Metadata Provider -
uses: arcxp/datadog-service-catalog-metadata-provider@v1
The workflow file itself can be very simple. Don’t believe me? Check this one out:
---name: Datadog Service Catalog Metadata Provider
on: push: branches: - main workflow_dispatch:
jobs: deploy: runs-on: ubuntu-latest steps: - uses: actions/checkout@v2 - uses: arcxp/datadog-service-catalog-metadata-provider@v1 with: datadog-hostname: api.us5.datadoghq.com datadog-key: ${{ secrets.DATADOG_KEY }} datadog-app-key: ${{ secrets.DATADOG_APP_KEY }} service-name: my-service team: my-team email: my-team@sirius-cybernetics-corporation.comThis is a fully functional workflow that will tell Datadog information about your service. It is triggered by a push to the main branch, or manually by clicking on the “Run workflow” button on the repository’s Actions tab (thanks to the workflow_dispatch key). Once triggered, this workflow will tell Datadog that your service is called my-service and that it is maintained by a team called my-team. That team can be reached at my-team@sirius-cybernetics-corporation.com if something goes wrong. Having a team name and email address associated with a service might not seem like much information, but it is highly useful for support teams during incidents. You can also see that this workflow is instructing the action to use the us5 host for Datadog (information required by the Datadog API), and it provides an API key as well as an application key.
But you might also want to add other useful information to this YAML file, such as a Jira board URL, a runbook document, and a PagerDuty integration URL. That’s not hard to do. Just look at this example:
---name: Datadog Service Catalog Metadata Provider
on: push: branches: - main workflow_dispatch:
jobs: deploy: runs-on: ubuntu-latest steps: - uses: actions/checkout@v2 - uses: arcxp/datadog-service-catalog-metadata-provider@v1 with: datadog-hostname: api.us5.datadoghq.com datadog-key: ${{ secrets.DATADOG_KEY }} datadog-app-key: ${{ secrets.DATADOG_APP_KEY }} service-name: my-service team: my-team email: my-team@sirius-cybernetics-corporation.com # Adding Jira, Runbook, and PagerDuty docs: | - name: Jira board url: https://somelegitorg.validatlassiancloudurl.com/ blah/blah provider: jira links: | - name: Downtime Runbook url: https://totally-normal-url.com/runbooks/downtime type: runbook integrations: | pagerduty: https://valid-pagerduty-url-here.comIt’s that easy. By using this GitHub Action, teams can now push their information to the Datadog Software Catalog without needing to approve any integrations. You can find the full schema for this action here.
To be clear, Datadog does already give you all the tools you need to use the Software Catalog product. Datadog already has a GitHub integration that can grab a simple YAML file that has this info. Datadog also already has an API that lets you send this info to Software Catalog with custom automation. Like many of you, though, I have constraints I’m operating under, which means I have had to innovate! If you’re using GitOps for deployments, for example, more integrations and webhooks can be concerning. By using this GitHub Action, folks can now push their information to the Datadog Software Catalog without needing to approve any integrations. The custom action also allows you to have full control and visibility over this process, including full control over when this information is sent to Datadog.
Use of the pipe character in YAML
Those who are familiar with YAML syntax may have noticed that within the workflow, nodes for docs, links, and integrations look a little unusual: They have a multi-line string pipe character (“|”) after the colon. This is because in GitHub Actions, all of the inputs are constrained to being scalar. In order to work around this limitation, the custom action takes these values in as a multi-line string and then parses them as YAML. It’s a little weird, but it gets the job done.
Organizational controls
A major advantage of the DSCMP is that it lets you supply service metadata to Datadog without opening your repository to any third parties. However, another benefit of using this custom action is that it provides light-touch technical controls to enforce policies that define which metadata must be included in your organization’s service definitions. For example, with the help of the DSCMP, you can set controls such as “everybody must have a tag called division that matches one of the division names within the organization,” or “every service running in production must have a runbook link.”
To set and enforce these organizational controls, you can include them in a file called the Organization Rules file (or Org Rules file), specifically named service-catalog-rules.yml. This file is saved to the directory your-organization-name/.github/. The DSCMP by default will look for the Org Rules in this location and enforce the rules defined there.
To support this function, I made a new YAML schema that has three primary components: rules, selection criteria, and requirements. Rules contain a name, a list of selection criteria, and a list of requirements. The selection criteria are the various fields which make a given rule apply to a repository’s use of the DSCMP. Requirements are the constraints that a repository’s DSCMP workflow must adhere to if the selection criteria apply to the repository.
Before we move on to some examples of how to enforce organizational controls, I want to mention a few “universal truths” about policy enforcement:
- There are always going to be exceptions
- If the controls aren’t centrally located and auditable, they can sometimes mutate into a gap rather than a control. (To be clear, this problem can happen in all cases, but centrally locating and auditing them is helpful in preventing mutations.)
- In order for organizational controls to be helpful:
- The control must be visible.
- Version control is a must.
- Exceptions must be supportable.
- In the event of non-compliance, the error message must be clear about what needs to change.
Finally, remember that using an org rules file is optional. If a workflow cannot find such a file, it will allow the DSCMP workflow to execute without restrictions.
Now, let’s dig into some examples.
Example 1: Requiring a “division” tag
The following Org Rules file, stored in sirius-cybernetics-corporation/.github/service-catalog-rules.yml, enforces a tagging requirement for all DSCMP workflows within a GitHub organization named Sirius Cybernetics Corporation:
---org: sirius-cybernetics-corporation
rules: - name: Division Tag Requirement selection: all requirements: tags: division: ANYWhen this Org Rule file is in place, if you try to run the first DSCMP workflow above—which doesn’t include a division tag—you will see an error reporting that it failed to satisfy the “Division Tag Requirement.” To meet this requirement in the new rule, then, you would need to modify the DSCMP workflow to include tags and division keys with a value, as follows:
---name: Datadog Service Catalog Metadata Provider
on: push: branches: - main
workflow_dispatch:
jobs: deploy: runs-on: ubuntu-latest steps: - uses: actions/checkout@v2 - uses: arcxp/datadog-service-catalog-metadata-provider@v1 with: datadog-hostname: api.us5.datadoghq.com datadog-key: ${{ secrets.DATADOG_KEY }} datadog-app-key: ${{ secrets.DATADOG_APP_KEY }} service-name: my-service team: my-team email: my-team@sirius-cybernetics-corporation.com tags: | - division:complaintsNow we have identified this service as belonging to the Complaints division of the Sirius Cybernetics Corporation.
Example 2: Constraining the “division” tag
Let’s say that we get the Org Rules file up and running, and folks start adding their division tag. The following week, however, someone makes a typo in the workflow file and specifies the “compliants” division—which is not a real division! To prevent this from happening again, we can iterate on the original Org Rules file to limit which values people can put into that division tag, as follows:
---org: sirius-cybernetics-corporation
rules: - name: Division Tag Requirement selection: all requirements: tags: division: - complaints - marketingWith this new version, we have restricted the division tag values to only complaints and marketing. Any other value will fail to satisfy this rule.
Example 3: Selective requirements within an organization
Let’s say the time comes for the services in the marketing division to require an issue tracker. We can configure the Org Rules file as follows to include a second rule requiring a Jira board for only the marketing division:
---org: sirius-cybernetics-corporation
rules: - name: Division Tag Requirement selection: all requirements: tags: division: - complaints - marketing - name: Marketing Jira Board Requirement selection: tags: division: marketing requirements: docs: provider: jiraThere, now we have two rules: one for requiring a division tag, and one which will require all DSCMP workflows with a specified division of marketing to also have at least one docs entry with a provider value of jira.
Keep in mind the following guidelines and restrictions regarding organizational controls:
- Lowercase is preferred. For any of the fields outside of
name, lowercase values are likely to work more consistently as expected. - The Org Rules file must exist within the same org as the repository that hosts the DSCMP workflows.
- YAML wants you to use spaces around colons, but Datadog uses tags with
key:valuesyntax. If you notice this inconsistency, don’t worry: spaces are automatically handled by the DSCMP.
Wrap-up
I’ll conclude by restating what I think is the value-add of this custom GitHub Actions I’ve been talking about: Datadog’s Software Catalog offering has the potential to substantially improve quality of life during production support. If a service goes down, this product can help them bring it back up more quickly.
But for your teams to get the most out of this Datadog product, you need to find a way to supply metadata about your organization’s services to Software Catalog. I’ve authored the open source GitHub Actions module Datadog Service Catalog Metadata Provider for this very purpose. DSCMP makes life easier by facilitating an easy setup that can be owned by the same engineers who stand to benefit from the quality-of-life improvements introduced by Software Catalog. It also helps ensure that organizations can establish and enforce, with technical controls, internal policies that formalize operational and support expectations. It does all this within the spaces that developers already use, with tools they already know, and without exposing their GitHub organization to any additional integrations.
And yes, as the title of this blog post says, I’m already using the DSCMP, as are several teams I work with. I hope you find it as useful as we do.


